Introduction
Winterizing raised garden beds is a seasonal task that rewards gardeners with healthier soil, fewer spring headaches, and better crop yields next growing season. If you want to know how to winterize raised garden beds, this guide lays out practical, climate-adapted steps from the last harvest through spring reopening, with timelines, recommended materials, and troubleshooting tips. You will find clear do this, do not do that advice for everything from mulching depths to protecting wooden frames and managing irrigation. Read through the scenarios and adapt the suggestions to your USDA zone and site conditions so you can spend more time planting in spring and less time repairing winter damage.
Quick overview and timeline for how to winterize raised garden beds
This section gives a compact roadmap you can follow when preparing raised beds for the cold season and reminds you which tasks are time-sensitive. The short timeline focuses on four broad stages: cleaning and harvesting, soil preparation, insulation and protection, and spring reopening. Use the timeline as a planning tool and check off tasks as you go so nothing essential is missed before freeze-up.
When to start
You should begin preparations for winterizing raised garden beds after the last harvest of sensitive crops and when nighttime temperatures regularly fall below about 40°F (4°C). This threshold helps protect seedlings and tender plants from shock and gives you time to complete soil amendments and cover cropping before hard freezes. Regional differences matter: in many temperate areas the window is late September through November; at higher elevations or in northern climates start earlier. Watch local weather forecasts and harden off late-season transplants sooner than you would in spring.
Typical timing by region
Seasons vary by zone and elevation, so the same set of tasks will shift on your calendar. In zones 8 to 10 the season is longer and you can often extend harvests into late fall while still prepping soil for winter cover crops. Zones 6 to 7 generally finish main-season crops by October and use that month to seed rye or clover. Zones 3 to 5 require earlier action, sometimes starting in September, to get protective mulch and insulating covers in place well before consistent hard freezes arrive. Microclimates created by buildings, bodies of water, or south-facing slopes will push your timing earlier or later.
Simple winterization timeline (4-step)
Begin with these four steps as a time-sequenced checklist to guide your work over several weeks. Each step has tasks that are quick to complete but have outsized benefits in protecting your beds and simplifying spring planting.
- Step 1 (2–4 weeks before freeze): Harvest, clean, test soil
- Step 2 (1–2 weeks before freeze): Amend and cover crop or mulch
- Step 3 (right before freeze): Insulate, protect structures, secure covers
- Step 4 (late winter/early spring): Remove mulch thoughtfully, test soil, plant cover crops if needed
Between these major steps you will often do small maintenance tasks such as repairing frames, draining hoses, and labeling beds. Stagger tasks across weekends if you have multiple beds to avoid burnout and to let amendments settle before heavy freezes.
Step 1 — Clean up and harvest: Preparing beds for winter
A careful, tidy fall clean-up sets the stage for healthy soil biology next season and reduces overwintering pests and diseases. This phase focuses on removing spent annuals, harvesting root vegetables, deciding what to keep in place, and making sure tools and equipment are clean and ready for storage. Taking the time now saves you hours in spring and prevents common problems like slug harborage, fungal carryover, and rot in wooden frames.
Remove spent annuals and diseased plants
Begin by pulling annual plants at the base and removing root masses where practical to reduce overwintering insect eggs and fungal spores. Compost healthy plant material that is free of pests and disease, but destroy or discard any plant debris that showed signs of blight, powdery mildew, bacterial spots, or other serious pathogens. If you are unsure whether a plant is disease-free, err on the side of composting in a hot pile away from vegetable beds or placing it in yard waste collection rather than home compost.
Discarding diseased plant material should be done promptly and with care so spores do not spread as you work. Burn or send diseased foliage to municipal green waste where allowed, or double-bag it for removal if local rules discourage burning. For large beds, work in sections so that you are not moving contaminated debris across the whole plot and washing tools between beds minimizes cross-contamination.
Harvest root crops and store properly
Root crops often store well over winter if harvested and stored correctly, but leaving some roots in the ground can be an efficient strategy if you plan to add insulation. Pull carrots, beets, and parsnips before the ground freezes solid unless you will heavily mulch them. For potatoes, dig and cure tubers in a dark, dry location with temperatures around 45 to 60°F (7 to 16°C) and store them in breathable containers.
When you decide to leave root crops in the bed, cover them with a thick insulating mulch layer such as straw or shredded leaves to prevent freeze-thaw cycles that can make roots mushy. If rodents are a problem, add hardware cloth or a layer of coarse material under the mulch directly over the rooting zone. For long-term storage of harvested roots, keep temperatures stable and check periodically for spoilage, removing soft items to prevent spread.
Salvage perennials and cover tender herbs
Not all plants should be removed; many perennials, berries, and hardy herbs are better left in place with winter protection. Identify which perennials are hardy in your zone and which ones need potted overwintering or placement in a cold frame. Tender herbs like basil or potted rosemary may survive short freezes with floating row covers but should otherwise be moved indoors or into protected microclimates.
When moving perennials or salvaging tender herbs, prune back only dead or damaged growth and avoid hard pruning late in the season when plants are going dormant. For borderline-hardy plants, add burlap wraps or temporary cloches to reduce wind desiccation and root stress. Label moved plants so you can track who came back in spring and who needs replacement.
Tools sanitation and storage
Tools are a vector for disease as well as a source of rust and wear that will degrade their usefulness if not maintained. Clean soil and plant residue from shovels, forks, rakes, and pruners, then disinfect cutting tools with a diluted bleach solution or alcohol, rinse, dry, and lightly oil metal parts to prevent rust. Sharpen pruners and blades now so they are ready for spring pruning and planting tasks.
Store tools in a dry, organized shed or garage and consider hanging them to reduce contact with damp floors that accelerate corrosion. For larger equipment such as wheelbarrows and hoes, inspect handles for splinters or rot and replace or treat them with linseed oil to extend their life. Keeping tools serviced in fall reduces the chance of damage when you need them early in the season.
Step 2 — Soil care: Amendments, testing, and cover crops
Healthy soil is the single best investment for future garden productivity, and fall is the ideal time to test and amend because materials added in autumn have months to integrate before spring planting. This step details how to run quick soil checks, interpret common results, add organic matter sustainably, and choose cover crops that fit your objectives. Thoughtful fall amendments can correct pH, add slow-release minerals, and feed soil biology through the cold months.
Soil test and interpret results
A basic soil test tells you pH and major nutrient levels, which guides whether you need lime to raise pH or sulfur to lower it, and whether phosphorus or potassium are deficient. Many local extension services offer inexpensive tests and interpretation tailored to regional crop recommendations; bring samples from several beds for representative results. When test results come back, plan lime or sulfur additions in fall because these materials take time to react with soil and are best applied before winter.
Record the results and recommended application rates per square foot so you can apply amendments evenly, and avoid adding high-nitrogen fertilizer late in fall unless you are seeding certain cover crops that will use it. When in doubt, prioritize organic matter and slow-release inputs because they improve long-term soil structure and microbial health rather than offering a quick but transient nutrient spike.
Add organic matter and amendments
Fall is an excellent time to incorporate well-aged compost, composted manure, rock phosphate, or other slow-release inputs that benefit soil over the winter. Spread a modest layer of compost across the bed and gently fork it in or leave it as a top dressing that will migrate into the soil over freeze-thaw cycles. For mineral amendments like rock phosphate or gypsum, sprinkle at the recommended rate and lightly work them into the surface; these do not need intensive mixing to be effective over months.
Avoid adding fresh, uncomposted manure right before freeze-up as high microbial activity can temporarily lock up nitrogen. If you add gypsum to improve heavy clay drainage, apply it in fall and use mulching to prevent surface crusting. Wherever possible, match amendment choice to soil test results and crop plan: a bed planned for leafy greens may have different needs than one reserved for root vegetables or blueberries.
Planting cover crops (green manure)
Cover crops are one of the most powerful tools for winter soil health, protecting against erosion, improving structure, and supplying nitrogen when you select legumes. Choose species based on your climate and spring plan: winter rye is a resilient sweeper for erosion control in cold zones, crimson clover or hairy vetch fixes nitrogen in temperate areas, and oats can provide a quick protective biomass in mild climates. Seed cover crops at recommended rates and lightly rake or roll to ensure seed-to-soil contact.
Cover crops reduce compaction by keeping roots in the ground, increase organic matter when terminated in spring, and disrupt pest cycles when used in rotation. If you plan to incorporate them in spring, mow or cut before seed set and allow a short regrowth period before turning them under to make incorporation easier and reduce the risk of re-seeding. In no-till systems, you can crimp or mow and leave residues as mulch, which preserves soil structure and microbial networks.
When not to till
Late-fall deep tilling can destroy the very soil structure you want to protect, exposing dormant fungal networks and beneficial organisms to harsh conditions. No-till or minimal surface disturbance preserves aggregates and the winter refuge for earthworms and microbes, which are essential for nutrient cycling in spring. If you must break up compacted spots, spot-till or fork those localized areas rather than rototilling entire beds in late fall.
There are exceptions: if a bed is heavily infested with root-feeding pests or has a severe thatch problem, a careful overturn and rework may be warranted, but plan to restore soil life with compost and cover crops afterward. Generally, postponing invasive cultivation until spring when soil biology is active again yields better long-term outcomes.
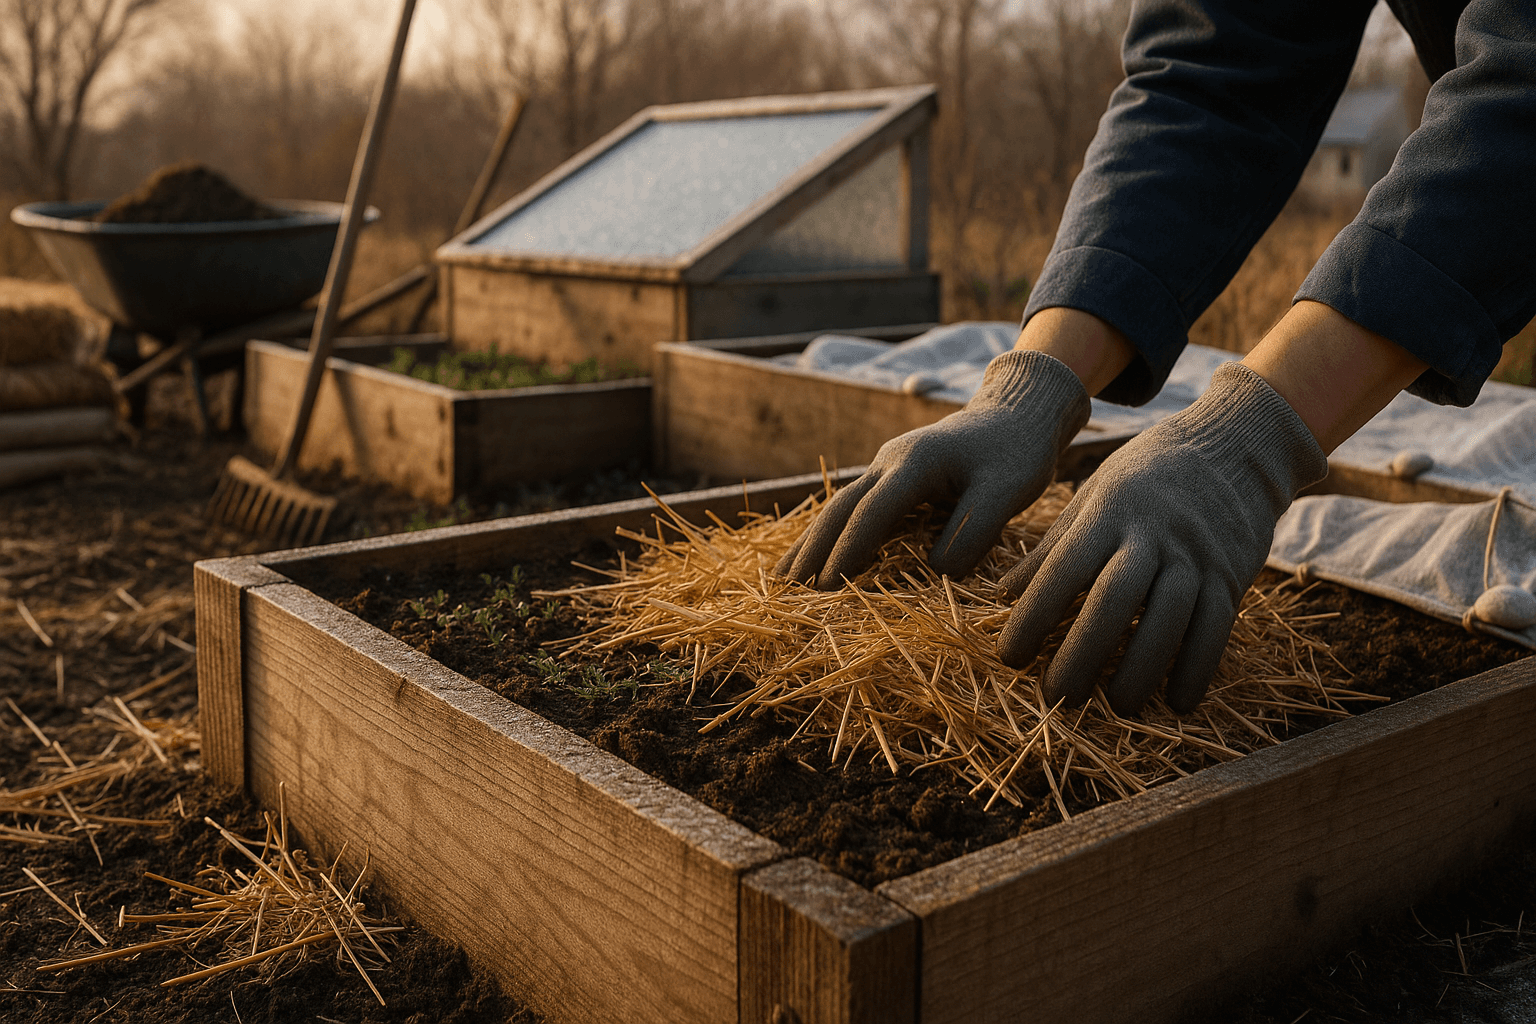
Step 3 — Mulching and insulating raised beds for winter
Mulch is both an insulator and a protector: it reduces frost heaving, prevents erosion, moderates soil temperature swings, and preserves moisture. Selecting the right type and depth for your raised beds depends on what you are protecting, your climate, and whether you plan to access planted crops. This section outlines materials, placement, and practical steps to shield roots and crowns from freezing and thawing cycles.
Mulch types and depths
Choose mulch materials that suit your goals: straw and shredded leaves provide excellent insulation and decompose into soil organic matter, wood chips are long-lasting and suitable for paths and perennial beds, and a thin compost layer can improve fertility while providing modest protection. Recommended mulch depths generally range from 3 to 6 inches; use 3 inches for fine-textured materials like shredded leaves where you want faster integration, and 4 to 6 inches for bulkier insulating materials like straw.
When applying mulch, keep a clean perimeter around stems and crowns to prevent rot and vole nesting, and avoid creating a dense mat that channels water toward plant stems. For beds with mixed plantings, vary mulch depth: deeper over bare soil and root crops you wish to protect, and light around hardy perennials and established shrubs to reduce rodent habitat.
Insulating for root crops and perennials
If you intend to overwinter root vegetables like carrots and parsnips in place, add a substantial layer of straw or shredded leaves as insulation, and cover the bed with burlap or an additional fabric if extreme cold is expected. For perennials, protect crowns with a breathable cover such as burlap or use floating row cover draped over a low frame to reduce wind desiccation. Pay attention to drainage and don’t let mulch create a constantly wet environment around crowns, which can lead to winter rot.
When winter temperatures cycle frequently between below and above freezing, heavy mulch helps mitigate freeze-thaw damage to roots and prevents frost heaving. In very cold zones, consider building a removable insulated lid or shallow cold frame over small perennial plots to add another layer of protection without moving plants.
Using fabric row covers, frost blankets, and cloches
Floating row covers and frost blankets are lightweight fabrics that trap a small layer of warmer air around plants and can extend protection during early frosts or sudden drops. Use row covers when you still have tender late-season vegetables to harvest, securing the fabric to frames or weights so wind does not displace them. Heavy-duty frost blankets provide more insulation but need secure fastening and periodic checks to prevent snow load damage.
Cloches are individual plant coverings that work well for small transplants or potted herbs, and low tunnels created with hoop frames and plastic can extend the harvest window in mild climates. Remember that plastic can trap moisture and promote rot if used directly on plants; always provide some airflow or use breathable fabric when covering crown areas to reduce disease risk.
Step 4 — Protecting beds, boxes, and hardware
Raised beds are made of materials that can weather poorly without some preventive maintenance, so inspect frames, fasteners, and removable elements before winter arrives. This step addresses wooden bed care, metal component protection, and the pros and cons of different covering methods. Securing structures now prevents collapse under snow load and reduces repairs come spring.
Winterizing wooden raised beds
Wooden frames benefit from a fall inspection and minor repairs such as replacing rotten boards, tightening screws, and treating exposed wood with natural sealants or boiled linseed oil. If your beds are made from non-toxic, untreated wood, applying a penetrating oil will slow moisture ingress and prevent freeze damage; avoid painting interior surfaces that contact soil since paint can flake and trap moisture. Do not use old pressure-treated lumber that contains harmful chemicals, or line the interior with heavy-duty landscape fabric if you must use pressure-treated wood.
Raising beds slightly on stones or gravel improves drainage and reduces direct contact with saturated soil that accelerates rot. For permanent frames, consider adding an internal lip or barrier to keep mulch and soil off the upper exposed edges of boards where water tends to collect and freeze. Small preventive actions now keep your beds intact for multiple seasons.
Protecting metal and removable components
Metal trellises, netting, and irrigation components can bend, corrode, or be displaced by heavy snow and ice if left unsecured. Remove lightweight trellises and store netting where it will not be crushed by snow, and if you leave structures in place, reinforce them with temporary stakes or cross-bracing. For irrigation lines, drain hoses and remove drip tape or exposed emitters that can split when frozen; if you have an irrigation manifold, blow out lines or insulate valves per manufacturer instructions.
Fasteners such as screws and brackets should be checked for corrosion and replaced with stainless or galvanized hardware where possible. Small metal parts stored in a dry box with desiccant stay rust-free and are easier to reuse come spring, reducing replacement costs.
Covering with tarp or breathable fabric
Choosing between a waterproof tarp and breathable fabric depends on what you need to protect. Tarps are good for covering stored materials and tools because they shed snow and water, but they can trap moisture on organic matter and frames, encouraging rot and mold. Breathable covers, such as landscape fabric or burlap, allow moisture to escape while providing insulation; these are usually better for plant and soil protection.
If you use a tarp over beds, always anchor corners and lift edges slightly to allow air movement and prevent condensation. Combine a breathable underlayer with a waterproof top layer for tool storage or for situations where heavy rain is expected, ensuring you do not seal the soil ecosystem off completely.
Water management before freeze
Proper water management in late fall prevents problems like frost heaving, root dessication, and standing water that can freeze into damaging ice. The right balance is to ensure beds are moist but not waterlogged going into freezing weather so plants retain some moisture while avoiding trapping excess water around roots or frame bases. This section covers last deep watering, drainage checks, and slope adjustments to keep your raised beds safe over winter.
Final deep watering and reasons why
A final deep watering about 24 to 48 hours before a hard freeze helps soils retain moisture and reduces frost heaving that can push small plants and roots out of the ground. Moist soil also freezes more slowly and evenly than dry soil, protecting root systems from temperature extremes. For beds with newly planted perennials or late transplants, this deep watering is essential to help plants with winter hardening.
Avoid shallow waterings or frequent sprinkling before freeze that leave the surface wet and prone to ice formation; instead, apply water slowly to penetrate the root zone. If a deep cold snap is predicted, a light top dressing of compost or mulch after watering can help lock in moisture and provide insulating benefit.
Managing drainage and slope
Raised beds typically drain faster than in-ground plots, but that advantage can turn into a liability if water is allowed to pool at the base or if subsoil is compacted and prevents lateral movement. Check that beds are slightly crowned or that soil slopes toward planned drainage outlets to prevent puddles that freeze and damage roots. If you notice standing water, consider adding a coarse sand or gravel layer beneath the bed or installing simple French drains at low points.
For beds sitting directly on clay or compacted soil, lift them slightly on stones or add a thin layer of course material beneath the floor to break the capillary flow that keeps beds overly wet. Regularly inspect drainage points during winter thaws and open frozen channels when safe to direct melt away from the bed sides and frames.
Pest and disease prevention over winter
Many pests and pathogens use plant debris and sheltered cavities to survive winter, so careful sanitation and habitat management reduce spring pest pressure. This section provides practical steps to remove overwintering hosts, practice rotation, and protect roots from rodents. Preventive measures now minimize the need for reactive pest control when growing resumes.
Clean debris and remove overwintering hosts
Keeping beds free of heavy debris like old mulch piles or seed heads discourages rodents and insects from nesting near crowns and roots. Remove hollow stems, dried foliage close to the soil surface, and spent mulch that is matted against stems because these microhabitats shelter slugs, earwigs, and voles. Compost healthy debris in a well-managed pile away from garden edges or chip and stack for other uses.
Where perennial flowers or herbs are left, trim seed heads only if they are known to harbor pests, otherwise leaving some structure can feed overwintering beneficial insects. Balance habitat removal with biodiversity goals: a tidy central bed can coexist with dedicated brush piles or insect hotels placed away from vegetable areas to protect beneficial populations.
Sanitation practices and crop rotation
Rotate plant families between beds to reduce build-up of family-specific pests and diseases, for example avoiding planting tomatoes in the same bed after tomatoes, peppers, or eggplant. Label bed contents and maintain a rotation log so that you do not accidentally repeat susceptible crops in the same spot. Sanitation includes removing diseased plants, disinfecting tools between beds, and giving soil a rest with cover crops rather than continuous production.
If you had a bed with severe disease problems, consider solarization in late spring or replacing the top layer of soil and thoroughly cleaning the frame. For most home gardeners, careful disease removal and rotation plus healthy organic matter inputs break many pest cycles over two to three seasons.
Rodent and vole protection
Rodents are attracted to thick mulch and sheltered bedding areas, so avoid piling mulch directly against stems and place a hardware cloth barrier under new beds or over exposed root zones for high-risk areas. For existing beds, a thin layer of coarse gravel under mulch near stem bases reduces rodent burrowing, and keeping compost piles away from garden edges cuts down on food sources that encourage rodent activity. Trapping and exclusion methods can be effective, but prevention through habitat modification is the least labor-intensive long-term strategy.
If you have heavy vole activity, installing a fine hardware cloth skirt around the perimeter of the bed and burying the lower edge a few inches will deter digging. Inspect mulch piles and remove any that show signs of chew marks or runways in order to break rodent root access points.
Climate-specific tips: adapting how to winterize raised garden beds
Not all winter strategies are equal; your region’s typical minimum temperatures and precipitation patterns will change which tactics are most useful. Below are tailored recommendations for cold, temperate, and mild climates so you can prioritize the most effective protections for your area. Use these as templates to modify the basic timeline and materials to match local realities.
Cold climates (zones 3–5)
In cold zones, winters are long and deep freezes are typical, so double-layer insulation and early protection are key. Add a deep mulch of 6 inches or more for root crops you plan to overwinter in place, and build removable cold frames or low tunnels to shelter small areas of perennials. Avoid leaving tender crops in the ground unless they are well-insulated and the mulch is rodent-proofed with hardware cloth.
Consider constructing sturdy windbreaks or snow fences to reduce ice scouring and desiccation, and plan to remove snow from raised beds if heavy accumulation risks crushing structures. Because freeze-thaw cycles are frequent in some areas, protecting against frost heaving by anchoring root zones or using sand-gravel mixes near crowns can prevent loss of small plants.
Temperate climates (zones 6–7)
Temperate zones have milder winters but occasional cold snaps, so focus on flexible protections like cover crops and moderate mulch. Plant winter rye or clover to hold nutrients and add organic matter, and use floating row covers for nights when freezes are forecast. Keep an eye on early spring warm spells that can coax premature growth; be ready to protect newly green shoots from late frosts.
In these zones you can also push fall planting of cool-season greens in low tunnels for extended harvests, while preparing beds with compost and soil testing that will pay off when planting intensifies in spring. Avoid over-mulching warm-season vegetables that benefit from faster warming soils in spring.
Mild climates (zones 8–10)
Mild regions allow gardeners to continue growing many crops through winter, but winterization still improves soil health and reduces pest pressure. Instead of heavy insulating mulch, emphasize cleaning disease-prone debris, continuing light-season harvests, and seeding cover crops where beds will be rested. Low tunnels and cloches extend warm-season crops, but maintain mulch to prevent erosion during winter rains.
Because pest pressure can remain year-round, keep sanitation and crop rotation practices in place even in mild climates. Consider sowing different cover crops that are more heat-tolerant or that establish quickly before seasonal rains, such as hairy vetch mixed with oats, and plan to terminate them earlier in spring to make room for the main-season crops.
Reopening raised beds in spring
Spring reopening is as important as winterizing; handling residues and mulch with care preserves the improvements you made in fall and helps you transition back to active growing. This section explains how to remove mulch without damaging soil, when to plant based on soil temperatures, and how to address compacted zones or nutrient shortfalls before seeding or transplanting.
How to remove mulch without damaging soil
Remove mulch gradually rather than pulling it all away at once, especially if the soil surface is still wet or prone to erosion. Start by raking back mulch to bed edges and save it for later use as topdressing or compost feedstock; leaving a thin layer of mulch can protect against sudden erosive rains. If you used a cover crop, mow and leave the residue as a surface mulch for a few weeks to break down before incorporation or replacement.
If you find areas where mulch has pooled against stems over winter, gently brush those away to expose crowns and avoid rot. Reuse clean, disease-free mulch selectively and replace material that has become matted and anaerobic over winter.
When to plant and prep soil after winter
Wait until soils reach the appropriate warm-soil thresholds for the crops you plan: most cool-season crops germinate well at soil temperatures around 45 to 55°F (7 to 13°C), while warm-season crops prefer 60°F (16°C) or higher. Perform a quick soil test or feel-test by squeezing a handful of soil; if it forms a ball and is relatively crumbles with a slight squeeze, it is workable. Lightly incorporate a top dressing of compost and avoid heavy tillage unless you have compacted patches that need spot remediation.
Plan your planting schedule to match soil warming, and start transplants indoors early if your spring is late so you can plant as soon as conditions are favorable. Label bed-specific amendments and rotations so you follow through on the fall plan you made.
Handling compacted zones and replenishing nutrients
Address compaction with targeted tactics: fork or double-dig only compacted spots and add organic matter rather than flipping entire beds. Overturning large areas can disrupt beneficial fungal networks, so focus mechanical action on localized hardpan or heavily trafficked spots. After decompacting, top-dress with compost and side-dress with balanced organic fertilizer as needed based on your soil test.
If nutrient depletion was visible last season, consider a light application of a balanced slow-release fertilizer or rock minerals before planting. Monitor plant growth and perform in-season foliar or soil tests if deficiencies appear, using corrective inputs calibrated to test results.
Tools, materials, and cost checklist for winterizing raised garden beds
A small investment in materials and a few hours of labor per bed can prevent costly repairs and poor yields next season. This section lists essential supplies and gives realistic time and cost estimates so you can plan the work and budget accordingly. Having the right items on hand makes the process efficient and helps you avoid last-minute trips to the garden center when weather windows are tight.
Essential supplies
Plan to have the following items available for a thorough winterization process: a supply of mulch such as straw or shredded leaves, finished compost, burlap or floating row cover, hardware cloth for rodent protection, basic hand tools and a soil test kit, and a natural sealant like boiled linseed oil for wood frames. Additional useful items include landscape fabric, garden twine and stakes, a battery-powered blower for clearing beds, and extra screws or brackets for frame repairs.
Acquiring these supplies in advance allows you to apply amendments promptly after harvest and accelerates cover crop seeding and mulching so you can finish before cold snaps. Many items are reusable year to year, so spend a little more on durable covers and hardware cloth and you will amortize the cost over seasons.
Estimated time and cost
Typical time required is about 2 to 6 hours per bed depending on bed size, complexity, and whether you need to repair frames or move heavy materials. A small 4 x 8 foot bed takes less time than a large 10 x 20 bed because handling material and mobility scale with size. For costs, expect to spend between 10 and 50 USD for mulch and compost per small bed if you buy supplies, while hardware cloth, quality row covers, and sealants are one-time investments of 30 to 150 USD depending on quality.
Labor is often the largest input if you value your time; consider recruiting friends or swapping work sessions with neighbors to reduce time and enjoy social motivation. If you hire help, expect labor costs to increase total expense but save significant personal hours during busy fall weekends.
Common mistakes and how to avoid them
Avoiding common missteps saves time and prevents setbacks that undo winter preparation. This section highlights typical errors—over-mulching, improper tilling, and neglecting structural repairs—and offers concrete fixes. Recognizing these mistakes before they happen makes your winterization work more effective and durable.
Over-mulching and creating rodent habitat
Too much mulch piled against stems becomes a rodent hotel and can suffocate crowns, so pull mulch back several inches from the base of plants and keep a clean collar to reduce nesting opportunities. If you need deep insulation for roots, use hardware cloth or gravel barriers under the mulch to deny rodents direct access to the soil surface. Periodically inspect mulch for rodent runways and adjust depth and placement accordingly.
When choosing mulch, prefer straw or shredded leaves rather than hay with weed seeds, and avoid fresh wood chips against vegetable crowns as they can immobilize nitrogen during decomposition. Save heavier wood chips for paths and perennial edges where rodent attraction is less critical.
Tilling at wrong time
Tilling late in fall gives cold and wet conditions that damage soil structure and biological communities instead of improving them. Use no-till cover cropping or limited spot-tilling for compaction rather than whole-bed rototilling once temperatures drop. If you do cultivate, follow with a generous compost top dress and a cover crop to rebuild fungi and earthworm populations.
If you must till to remove diseased sod or roots, do it well before freeze-up so the soil has time to recover and re-establish microbial life. Consider solarization or sheet mulching as alternatives for beds with persistent problems.
Ignoring drainage and structural repairs
Ignoring frame repairs or drainage issues leads to waterlogged beds and frozen damage that are costly to fix in spring. Repair loose boards, ensure bed elevation is adequate, and direct surface runoff away from beds with simple grading or swales. Seal or oil exposed wood before heavy rains set in and check that corner posts are secure to resist snow loading.
Preventative maintenance done in fall is cheaper and faster than emergency repairs in early spring, and it protects the soil work you invested in over the season.
Step-by-step winterization checklist (printable sequence)
Follow this ordered checklist to methodically prepare raised garden beds for winter; it condenses the full guide into actionable steps you can print and check off. The list is prioritized by timing and impact, so starting at the top yields the biggest benefits.
- Harvest and remove plants
- Soil test and add amendments
- Plant cover crop or add compost
- Mulch 3–6 inches
- Insulate perennials and root crops
- Secure frames, remove hoses, shelter hardware
- Final deep watering
- Label beds and schedule spring tasks
After completing the checklist, note any follow-up tasks such as repairing a frame, replacing damaged tools, or reseeding a thin cover crop area so nothing is forgotten during winter.
FAQ: How to winterize raised garden beds (common questions)
This FAQ addresses the frequent questions gardeners ask about winter preparation and gives concise, practical answers you can apply immediately. Answers include safety tips, material choices, and timing reminders to reduce uncertainty.
Q: Do I need to winterize raised beds differently than in-ground beds
Raised beds drain faster and therefore can dry out more severely during winter, which means mulching and pre-freeze watering are particularly important to maintain root moisture. Raised structures also expose more wood and framing to the elements, so inspect and treat sides and fasteners for rot or corrosion. Finally, consider airflow and insulation differently; raised beds may need deeper mulch for root protection than an equivalent in-ground bed.
Q: Can I leave my cover crops in the raised beds over winter
Yes, many cover crops can remain through winter and are often mowed or cut in spring and left as a mulch, or incorporated in early spring when they begin vigorous growth. If a cover crop is likely to go to seed, mow it earlier to prevent weed issues and prevent it from becoming a volunteer crop. Planning termination timing prevents planting delays.
Q: How thick should mulch be to winterize raised garden beds
Aim for 3 to 6 inches depending on material and objectives: 3 inches for shredded leaves, 4 inches for straw, and up to 6 inches for heavy insulating needs in cold climates. Avoid piling mulch directly against stems or crown tissue and reduce depth near perennial bases to prevent rot. Adjust depth based on microclimate and pest pressure.
Q: Should I remove all plant debris before winter
Remove diseased material and annuals, but you can compost or leave healthy, non-seed-bearing plant matter where disease risk is low and beneficial insects need shelter. Avoid leaving thick debris mats that create pest habitats close to edible plants. For vegetable crops, best practice is to clear most aboveground debris and compost it properly.
Q: Is it OK to till my raised beds in late fall
Generally, no. Tilling in late fall disrupts soil structure and beneficial fungi and should be avoided unless you have a compelling reason, such as dealing with severe pest or disease build-up. Use no-till strategies, cover crops, and spot cultivation for compacted areas instead. Reserve deeper soil work for early spring when soil biology is active.
Q: How do I protect root vegetables left in raised beds
Mulch heavily with straw or shredded leaves, place a breathable cover like burlap if extreme cold is expected, and remove mulch gradually in spring. Use hardware cloth or gravel barriers if rodents are a concern and monitor for spoilage when temperatures fluctuate. A slightly raised ridge over the root zone can also help with drainage and reduce freeze-thaw stress.
Q: What should I do with irrigation and drip lines
Drain and store hoses, remove drip tape that will be crushed by freeze cycles, and blow out lines where recommended by your irrigation manufacturer. Protect above-ground valves with insulation and relocate sensitive controllers indoors. Regular winter checks prevent cracked lines and lost pressure in spring.
Q: How do I winterize wooden raised beds to prevent rot
Repair loose boards, apply natural oil-based sealants such as boiled linseed oil in early fall, and consider lining the interior with heavy-duty landscape fabric to reduce direct soil contact. Use rot-resistant wood or composite materials for new beds and avoid contact with chemically treated lumber near edible soil. Raised beds on gravel or stones reduce ground moisture contact and extend life.
Q: Can I use plastic tarps to cover raised beds
Plastic tarps can be useful for covering tools and non-organic materials but are not ideal for covering soil or plant material because they trap moisture and can promote rot. Use breathable covers, burlap, or landscape fabric for plant protection, and if you use a tarp, allow ventilation and avoid sealing edges tightly. Combine breathable and waterproof layers where necessary with attention to airflow.
Q: How long does winterization last and when should I re-evaluate
Winterization covers the cold season and should be re-evaluated in early spring when soils thaw and consistent warmer temperatures return. Revisit mulch depth, cover crop termination, and frame integrity at that time and adjust for any winter damage. Keep a seasonal log so you remember what worked and what needs changing next year.
Q: Will cover crops attract pests over winter
When managed properly, cover crops usually suppress pests by improving soil health and disrupting pest cycles; however, allowing them to go to seed or leaving excessively dense residues can provide shelter for rodents. Mow or terminate cover crops at the right time and avoid letting them become a habitat for pests by keeping an eye on thickness and moisture. Strategic placement of cover crop plantings away from high-value beds can also reduce risk.
Closing notes
Follow this organized approach to learn how to winterize raised garden beds efficiently and protect your investment for a productive spring. Tailor mulch depth, cover crop choice, and insulation methods to your local climate and gardening goals, and use the printable checklist to keep your work systematic.