Introduction
Burnt edges and a bitter bite usually mean your pan ran hotter than the shallots’ sugars can handle. Use medium‑low heat, a heavy pan, and tiny water splashes to buffer temperature, and you’ll caramelize shallots without burning into sweet, jammy strands.
A single dial notch is often the difference between silky, golden shallots and a pan of acrid scraps. Because shallots are small, their thin slices pick up heat fast; unchecked, the natural sugars scorch before they can transform. The solution is patience plus control: maintain a gentle sizzle, manage moisture, and stir on a schedule instead of reflex. Learn how to caramelize shallots without burning by building heat gradually, letting the shallots sweat, and rescuing sticky bits with a teaspoon of water at a time. The moment the aroma shifts from sharp to sweet, you’re on the right track.
A heavy skillet, medium‑low heat, and a splash‑and‑scrape routine turn “almost there” into perfect every time because the heat stays steady while the sugars brown evenly instead of blackening at the edges.
Key takeaways at a glance
Gentle heat, even slices, and a wide pan prevent scorching by keeping temperature and contact predictable. Start with oil for stability, finish with butter for flavor, and deglaze in sips to dissolve stuck sugars before they burn.
Getting the core moves right makes everything else easier. Consistency of slice thickness keeps cooking rates aligned. A heavy pan avoids hot spots. Stirring occasionally, not constantly, gives the shallots time to color where they touch the surface, then redistributes that color across the batch. When fond clings, dissolve it; don’t fight it. The result is deep sweetness without bitterness.
- Use medium‑low heat and a heavy pan to prevent hot spots
- Slice uniformly and avoid overcrowding the pan
- Start with oil for higher smoke point, finish with butter for flavor
- Stir occasionally, not constantly, and adjust heat to keep a gentle sizzle
- Deglaze stuck bits with small splashes of water, stock, or wine
- Expect 20–35 minutes on the stovetop, 35–50 minutes in the oven
Small choices compound across the cook time, so stick to these principles and you’ll find the window between pale and burnt widens noticeably.
Why shallots burn and how caramelization works
Shallots burn when surface temperature outpaces moisture loss and sugar transformation. Keep heat modest and moisture managed so sugars caramelize gradually instead of scorching into bitter carbon.
Because shallots are lean on proteins and rich in sugars, flavor development revolves around caramelization more than Maillard reactions. Heat breaks sugars into hundreds of aromatic compounds, but this takes time at controlled temperatures. Push too hard, and the thin edges carbonize before the centers soften, leaving you with black freckles and raw crunch in the same bite.
The science behind caramelization vs Maillard browning
Caramelization is sugar‑only browning; Maillard needs proteins and sugars together. According to Harold McGee in On Food and Cooking, sugar caramelization typically begins between about 110°C and 170°C (230°F–338°F), depending on the sugar type. Shallots skew toward this pathway, so they reward patience and punish high heat.
Caramelization builds flavor more slowly than Maillard, which means the pan temperature must rise slower and steadier; a fast sizzle that races past 175°C (347°F) will blacken thin edges before sugars can convert into sweetness.
Ideal heat range and moisture control
Moisture is a buffer. Early on, shallots release water that holds the pan near boiling temperature, protecting sugars while flavors concentrate. As that water evaporates, the pan can climb into the browning range. Aim for a gentle sizzle—audible but calm—and nudge the dial down if color appears too fast.
Revelation moment: Constant stirring is not protective. Tests by Serious Eats show onions picked up better color and sweetness when stirred occasionally rather than nonstop, because extended contact with the pan encourages even browning instead of steaming the slices.
Oil vs butter and smoke points
Oil steadies the process; butter finishes it. According to America’s Test Kitchen, typical smoke points run roughly 375°F–410°F for olive oil, about 400°F–450°F for many neutral oils, and 300°F–350°F for whole butter, while ghee often lands 450°F–485°F. Start with oil to keep milk solids out of harm’s way, then add butter once color is established.
Fond — the browned bits that stick to the pan; concentrated flavor formed from sugars and aromatics.
Sweat — a gentle cook that softens vegetables and releases moisture without browning.
Deglaze — to dissolve fond with a small splash of liquid, loosening stuck sugars and preventing scorching.
Ingredients and equipment checklist
Four to six shallots, a tablespoon or two of oil, and a heavy skillet are enough for deeply sweet results. Season lightly at the start and finish with butter or acid to balance.
Keeping the ingredient list short puts all emphasis on the technique. The pan matters more than any optional add‑in, because even heat is the shield that prevents burnt edges. Choose oils with a comfortable smoke point, pick a skillet with a wide floor, and keep flavor boosters for the end when the shallots are already tender and golden.
Core ingredients
Shallots vary in size; aim for enough slices to cover your skillet in a single, thin layer. A pinch of salt early helps pull out moisture, which moderates the pan temperature during the sweat phase.
- Shallots: 4 to 6 medium
- Oil: 1 to 2 tablespoons neutral or olive
- Salt: a pinch to help draw moisture
A small ingredient list rewards precision. Measure the oil, don’t just pour freely, or the shallots will stew instead of brown.
Optional flavor builders
Once the shallots are amber and soft, fat and acidity sharpen the profile. Herbs and ground spices can scorch if added early, so wait until the final minutes to fold them in.
- Butter: 1 tablespoon to finish
- Black pepper, thyme, rosemary, bay leaf
- Balsamic vinegar, white wine, sherry, or a pinch of sugar for balance
A tiny pinch of sugar can jump‑start color in stubborn batches, but monitor closely because added sucrose darkens quickly.
Best pan and tools
A pan with a thick base spreads heat evenly and reduces hot spots. Stainless steel and cast iron both shine here; nonstick is workable but less efficient at developing fond.
- Heavy‑bottomed skillet (stainless steel or cast iron) for even heat
- Wide surface area to avoid crowding
- Flexible spatula or wooden spoon
A 10‑ to 12‑inch heavy skillet spreads two packed cups of sliced shallots into a single layer, cutting burning risk dramatically by ensuring steam escapes while contact—and therefore browning—remains even.
Prep the shallots for even cooking
Uniform slices cook at the same pace, which prevents a mix of burnt slivers and underdone strands. Dry the surface, salt lightly to draw internal moisture, and keep pieces similar in thickness.
Preparation may feel basic, but it fixes most caramelization problems before they start. Slicing shallots pole‑to‑pole (root to tip) yields tidier strands that hold together in the pan, while cross‑cuts create more half‑moons that can separate. What matters most is consistency; aim for slices that look like they belong together.
How to slice for uniform results
Peel the papery skins completely so they don’t blacken on contact. Halve the shallots lengthwise, then slice into planks or half‑moons about 3–5 millimeters thick. Thinner slices cook faster but demand more vigilant heat control, while thicker slices need a touch longer to soften.
Keeping slices between 3 and 5 millimeters reduces variance in doneness by aligning moisture loss across pieces; the pan stays calmer, the color builds more evenly, and edges stop racing ahead of the centers.
Dry vs damp shallots
Patting the cut surfaces dry prevents excess surface water from flooding the pan, but do not struggle against the shallots’ natural internal moisture. That water protects sugars early and eases the transition into browning later. A few stray droplets won’t ruin the batch; puddles will.
Seasoning strategy
A pinch of salt early starts the sweat, breaking down the rigid layers. Keep the finish in mind: you can sharpen sweetness with a dot of butter, round it out with a splash of wine or vinegar, and add herbs right at the end for perfume.
Step by step stovetop method low and slow
Caramelize shallots on medium‑low heat for 20–35 minutes by first sweating them translucent, then browning with occasional stirring, and finally finishing with butter and a splash of acid. Deglaze stuck bits with teaspoons of water to prevent scorching.
Direct answer for quick reference: The safest stovetop method is medium‑low heat in a heavy pan with 1–2 tablespoons of oil, shallow layering, and stirring every 2–3 minutes. When sticking appears, add 1–2 teaspoons of water to dissolve fond, scrape gently, and lower heat if edges darken too quickly.
Step 1 Preheat the pan
Warm a heavy skillet over medium‑low for 2–3 minutes. Add the oil and watch for a soft shimmer; if it smokes, cool it down before the shallots go in. Preheating this way stabilizes the pan’s temperature and prevents a hot‑cold‑hot roller coaster that leads straight to burnt spots.
Step 2 Add and coat
Toss the sliced shallots into the pan and stir to coat each piece with oil. Spread them into a thin, even layer; a mound will steam at the top while the bottom risks scorching. You should hear a gentle sizzle, closer to a whisper than a hiss.
Step 3 Gentle sweat phase 5 to 10 minutes
Keep the heat steady and stir every 2–3 minutes. The shallots should turn translucent and begin to soften without much color. If browning appears at the edges this early, lower the heat slightly and let the moisture catch up to the heat.
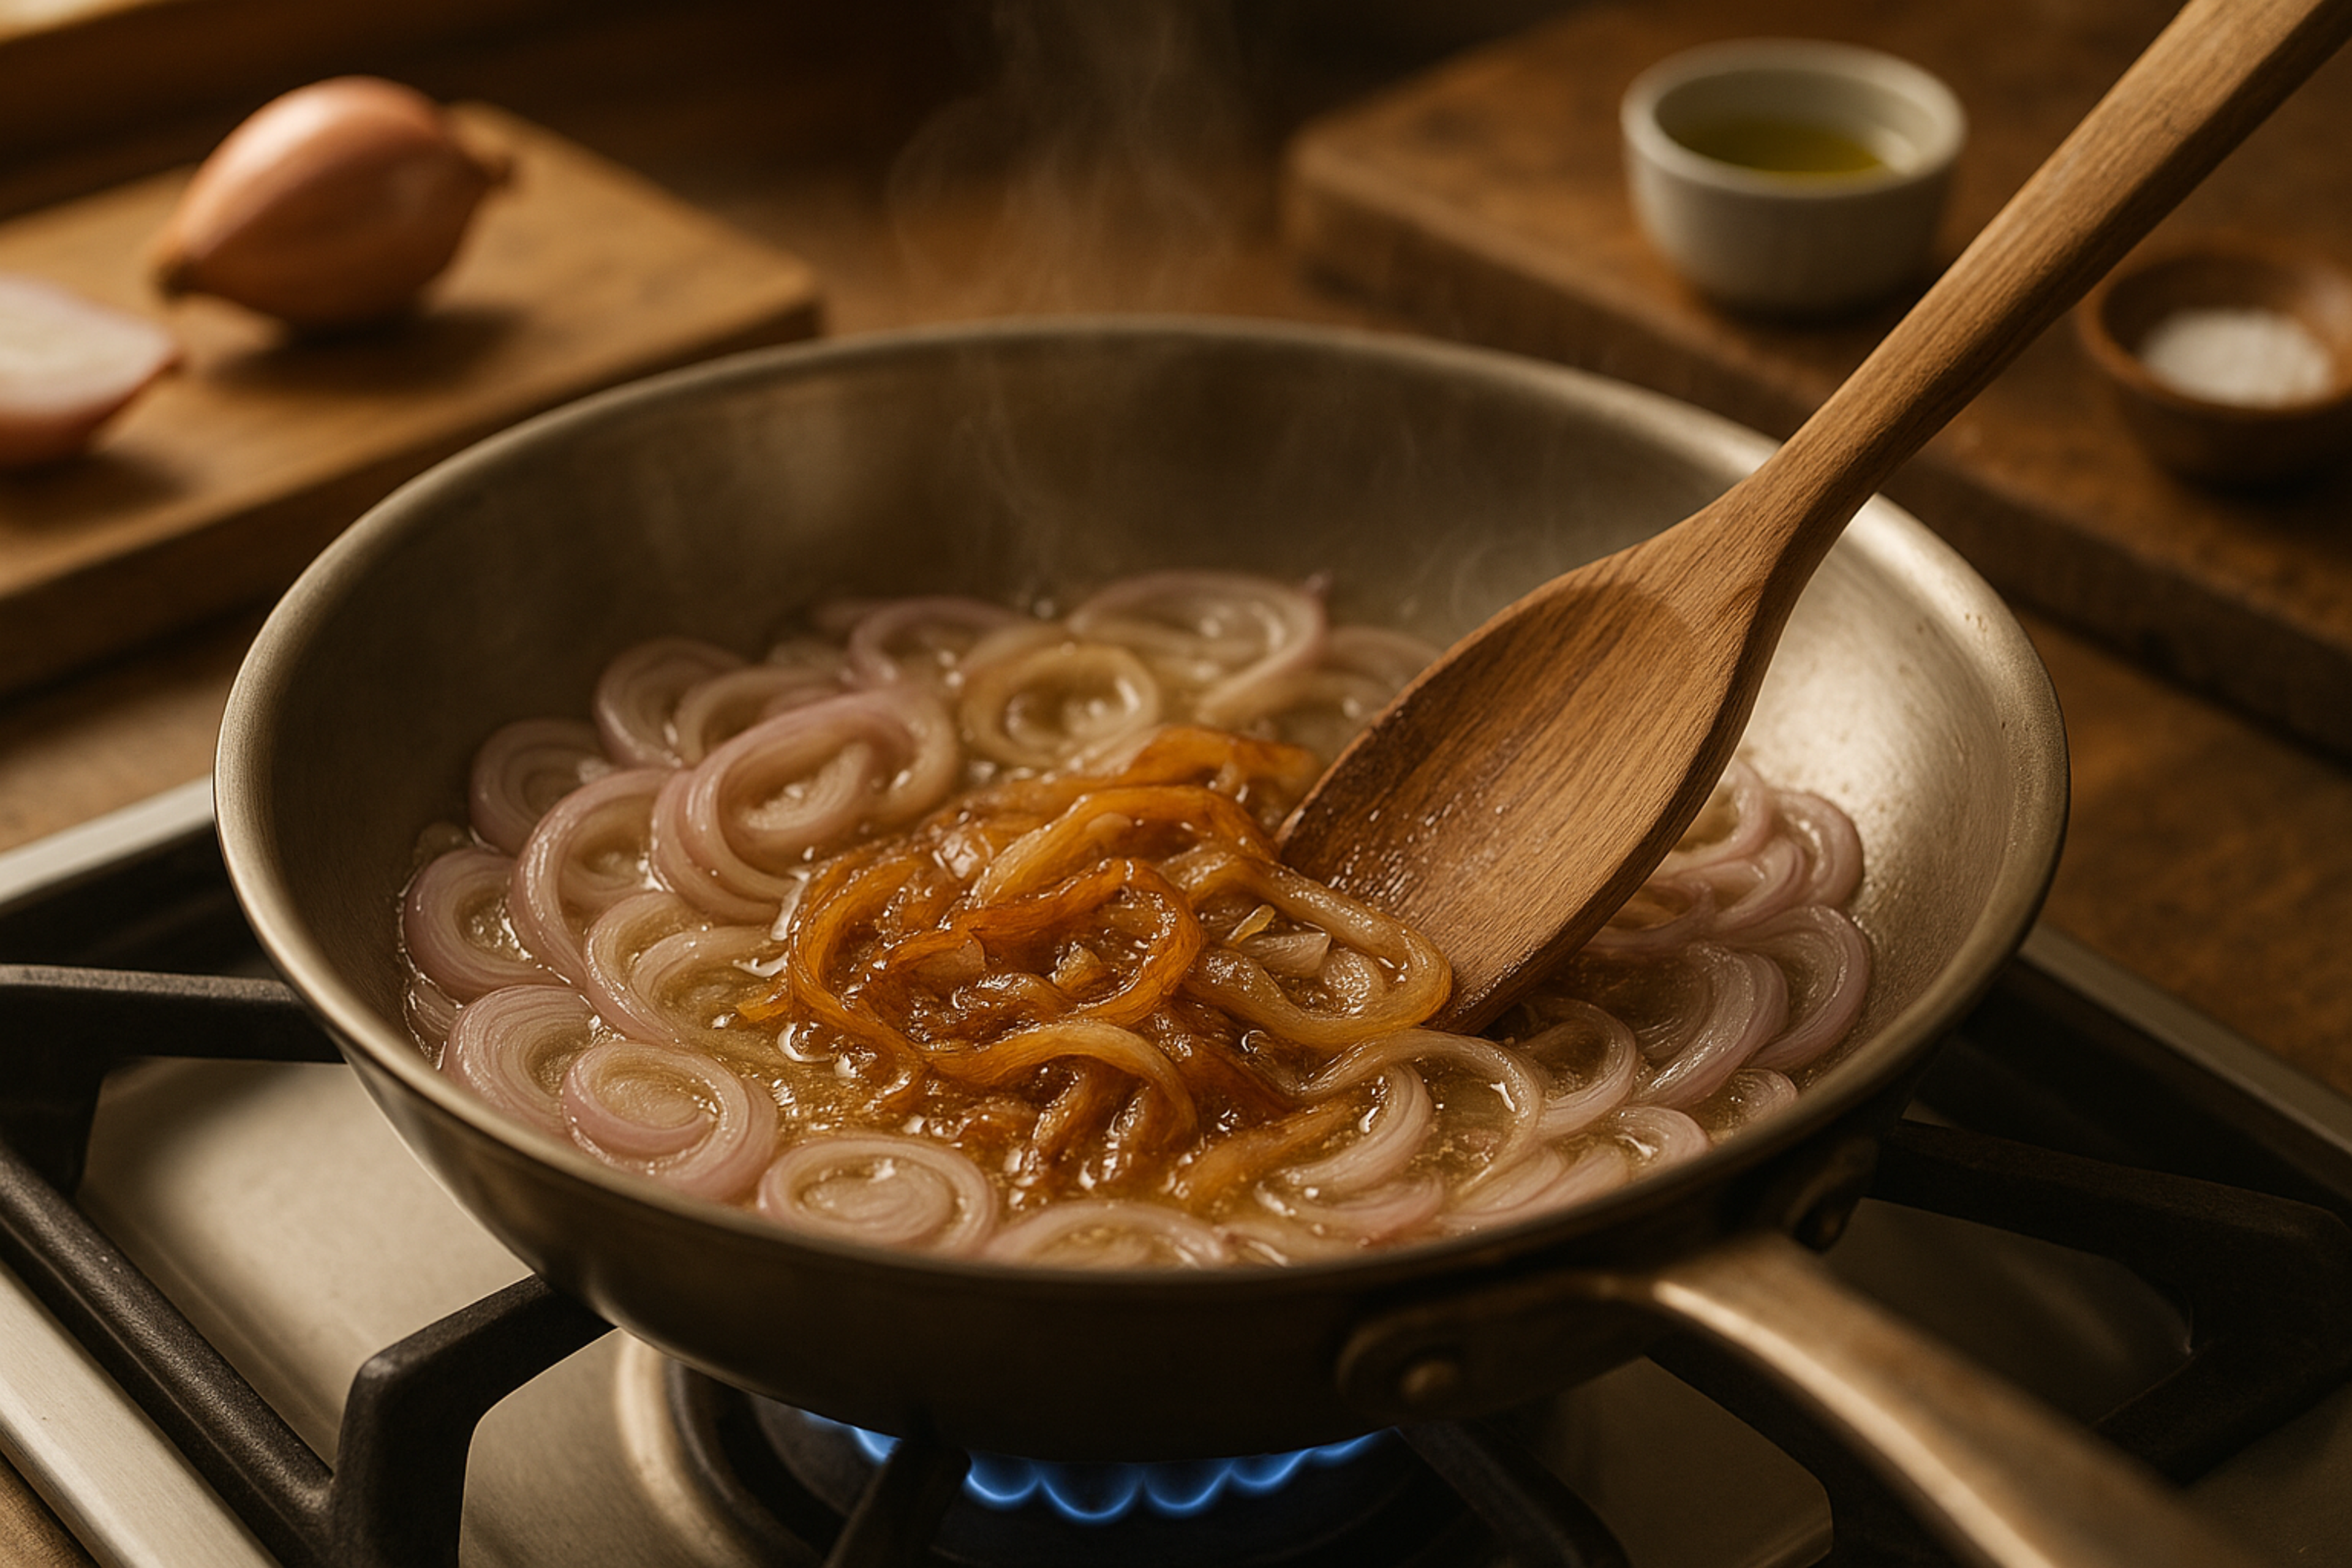
Step 4 True caramelization 10 to 20 minutes
Color deepens in waves. Stir occasionally to rotate contact points and scrape the pan bottom if fond develops. If the fond feels tacky or the slices tug against the pan, add 1–2 teaspoons of water or wine and scrape with a wooden spoon to dissolve and redistribute flavor.
Small deglazing splashes—no more than two teaspoons at a time—reset the pan’s temperature and dissolve sugars before they cross from amber to black, which is why careful micro‑deglazing is safer than a big pour that stews everything.
Step 5 Finish and balance 2 to 3 minutes
When the shallots turn deep golden to amber and feel jammy, stir in a tablespoon of butter for gloss and roundness. Taste and add salt if needed. A quick splash of balsamic, dry sherry, white wine, or lemon brightens the sweetness without overwhelming it.
Oven method for hands off caramelized shallots without burning
Roast shallots at 350–375°F in two stages: covered to steam, then uncovered to brown, stirring twice. Oil and salt help the heat move evenly; butter and a splash of acid finish the gloss and balance.
Oven heat is consistent, which makes it great for hands‑off caramelization and for larger batches. The two‑stage technique removes guesswork by softening the shallots before they color. Covering traps steam early, preventing early scorching, then removing the foil allows browning to develop evenly.
Setup and temperature
Heat the oven to 350–375°F (175–190°C). Toss sliced shallots with 1–2 tablespoons of oil and a pinch of salt, then spread in a single layer in a wide roasting pan or on a rimmed sheet. A roomy pan is essential; crowding blocks evaporation and slows color.
Two stage roast for even color
Cover the pan tightly with foil and roast 15–20 minutes to steam and soften. Uncover and roast 20–30 minutes more, stirring once or twice for even browning. If edges darken faster than the centers, reduce the temperature by 10–15°F and extend the time.
Finish and glaze
In the final 5 minutes, toss with a tablespoon of butter and a splash of balsamic, sherry, or white wine. Herbs like thyme or rosemary can go in here without burning. Pull the pan when the shallots are deep golden and slump into glossy, tender strands.
Covering for 15–20 minutes at 350–375°F equalizes temperature and melts early fond back into the shallots, cutting stirring needs roughly in half compared with uncovered roasting while protecting against bitter hot‑spot charring.
Pro tips to prevent burning at any stage
Use a wide, heavy pan and keep a calm sizzle; micro‑deglaze when sticking starts, and finish with butter rather than starting with it. These habits widen your safety margin and keep flavors sweet, not acrid.
When the goal is control, fewer variables produce better results. A wide skillet drops the stack height so moisture escapes steadily; a heavy base means small dial changes don’t swing the temperature. Think of water like a brake pedal—tiny taps when color moves faster than texture.
Manage heat and contact
- Keep to medium‑low and adjust based on sound and color, not the recipe clock
- Use a wide pan to reduce stacking and hot spots
- Stir every 2–3 minutes to alternate contact without breaking the browning cycle
Be willing to lower the heat mid‑cook. Sugar doesn’t care about the timer; it cares about temperature.
Control moisture
- Add 1–2 teaspoons of water to dissolve fond and pull the pan back from the brink
- Avoid excessive liquids that can stew rather than caramelize
A small, frequent splash does more to protect sweetness than one big pour that floods the pan and washes away sticky flavor.
Choose the right fat and timing
- Start with oil, finish with butter for aroma and gloss
- Clarified butter (ghee) works well if you want buttery flavor with higher heat tolerance
Butter’s milk solids burn fast; give them a cameo at the end, not a starring role at the start.
Flavor variations and serving ideas
Treat caramelized shallots as a base you can bend sweet, savory, or umami‑rich with last‑minute additions. Add delicate aromatics late, and balance sweetness with acid or bitters to avoid a one‑note finish.
Once the shallots are silky and amber, think about direction. Herbs and aromatics added in the final minutes will perfume without scorching. A splash of something tart counters the honeyed notes, and a touch of umami turns the whole pan into a sauce component on contact with heat.
Savory and herbaceous
- Thyme and bay for a French‑leaning profile
- Rosemary and black pepper for roasted meats
- Garlic added in the last 3–5 minutes to avoid burning
Herbs that are woody (rosemary, thyme) tolerate finishing heat better than soft herbs; save parsley or chives for the plate.
Sweet and tangy
- Balsamic or sherry glaze to amplify caramel notes
- A pinch of sugar or honey to balance acidity in a wine reduction
Acidity reins in sweetness, while a measured pinch of sugar can provide shine in lean, tart sauces.
Umami rich twists
- Soy sauce or tamari for saline depth
- Miso paste whisked with a splash of water for a glossy, savory glaze
Umami additions can replace salt at the finish, so taste first before seasoning.
Ways to use caramelized shallots
- Fold into mashed potatoes or risotto
- Top steaks or burgers
- Finish pastas and pizzas
- Layer in tarts and galettes
- Blend into dips, compound butters, and vinaigrettes
Think of them as ready‑made flavor concentrate: a spoonful can wake up leftovers and make weeknight meals feel deliberate.
Troubleshooting and common mistakes
If edges burn while centers stay crunchy, slow the heat and fix your slice thickness. When sticking turns bitter, dissolve it with water, not force; when color stalls, reduce crowding or raise heat slightly.
Troubleshooting starts with observation. The sound should stay steady; the color should advance gradually. Any smell of acrid smoke means the heat is outrunning the moisture. Texture clues—jammy, not wet; slumped, not shredded—tell you where you are on the timeline.
Burnt edges but raw centers
Uneven slicing or too much heat is the usual culprit. Reduce heat to medium‑low and commit to consistent 3–5 mm slices next time. A brief covered sweat can also help equalize temperature early before you uncover and brown.
Sticking and bitter taste
A dry pan leads to burned fond. Lower the heat, add 1–2 teaspoons of water, stock, or wine, and scrape gently to dissolve. If needed, add a drizzle more oil to re‑lubricate the surface before continuing.
Greasy or oily texture
Too much fat early will poach rather than brown. Use just enough oil to coat at the start and finish with a small pat of butter for gloss. If a slick forms, let the pan run a touch hotter for a minute to re‑emulsify.
Pale and soggy
Crowding or excess liquid is slowing evaporation. Increase heat slightly, spread the shallots into a thinner layer, and allow moisture to cook off with the pan uncovered until color returns.
Storage, freezing, and reheating
Cool caramelized shallots quickly, store airtight up to 5 days, or freeze flat for 3 months. Reheat gently with a splash of water or oil to restore gloss without scorching.
Treat finished shallots like a condiment. Portion them into small containers so you only thaw what you need. Rapid cooling prevents residual heat from pushing them past amber into bitterness, especially with cast‑iron pans that hold heat.
Refrigeration
Store in an airtight container up to 5 days. A small layer of oil on top can help limit oxidation. Label the container so you remember when the clock started.
Freezing
Freeze in thin, flat portions for up to 3 months. A freezer bag pressed flat or a small deli cup works well. Thaw overnight in the refrigerator to keep texture intact.
Reheating
Warm over low heat with a teaspoon of water or a little oil. High heat will re‑brown the sugars too quickly and tip the flavor toward bitter. A quick splash of vinegar can revive the brightness if the sweetness feels heavy.
Nutrition, swaps, and dietary notes
Caramelized shallots are naturally vegetarian and gluten‑free, and they adapt easily to dairy‑free or vegan cooking by using olive oil only. Red or sweet onions can stand in with adjusted timing.
Shallots deliver big flavor for minimal calories because the browning phase concentrates natural sugars rather than adding heavy fats. Finishing with butter is optional; olive oil alone can deliver a clean, peppery profile. For those avoiding lactose, ghee offers butter aroma with much higher heat tolerance.
Dietary flexibility extends to the onion family. Red onions or sweet onions behave similarly but need more time because of their size and moisture content. Expect 30–50 minutes on the stovetop and lean more on deglazing to keep sugars from catching on the pan.
Frequently asked questions
Calm heat, occasional stirring, and tiny deglazing splashes produce sweet, jammy shallots with none of the bitterness that comes from scorched sugars. These concise answers address the most common snags and speed bumps.
How long does it take to caramelize shallots without burning
On the stovetop, plan for 20–35 minutes on medium‑low heat. In the oven, plan for 35–50 minutes at 350–375°F using a covered‑then‑uncovered approach for even softening and color. Times vary with slice thickness, pan size, and how full the skillet is.
Should I add sugar to caramelize shallots
Not required. Shallots contain enough natural sugars to brown beautifully. A small pinch of sugar can accelerate color in stubborn batches, but it raises burn risk, so use sparingly and watch the pan closely as color approaches amber.
Butter or oil for the best results
Start with oil for a higher smoke point and stability, then finish with butter for aroma and gloss. According to America’s Test Kitchen, whole butter’s lower smoke point makes it prone to scorching in the early stages; ghee is a safer buttery alternative.
What if my shallots keep sticking
Lower the heat and deglaze with 1–2 teaspoons of water, stock, or wine, scraping up the browned bits gently. Sticking often means the pan is too dry or too hot; dissolving the fond resets both the temperature and moisture.
Can I speed up caramelization safely
You can run slightly hotter if you micro‑deglaze with teaspoons of water to keep sugars from tipping into bitter. A tiny pinch of baking soda accelerates browning, as noted by Serious Eats, but it softens texture and raises burn risk, so monitor color constantly.
Do I need to cover the pan
Optional. A brief covered sweat early helps soften and equalize temperature, especially with thicker slices. Uncover for evaporation and browning, otherwise the shallots will stew and stay pale.
How do I know when caramelized shallots are done
They will be soft, jammy, and deep golden to amber with a sweet, rounded aroma and no sharp onion bite. If they taste sweet but flat, finish with a splash of acid to bring the flavors into balance.
Conclusion
The most reliable insurance policy is control: a calm sizzle, a wide pan, and a teaspoon of water at the right moment. Master that rhythm and you can push color darker without fear.
There’s also a third path worth trying: hybrid cooking. Start the shallots covered in the oven to stabilize texture, then finish them on the stovetop where fond can be built and glazed with precision. The oven sets the stage; the burner writes the finale. Once that sequence clicks, you’re free to push flavor further, swapping oils, herbs, or acids to match whatever’s on the plate without ever drifting back toward bitter.